How to fix DNS issues on Windows 10 [Quick Guide]
How to prepare DNS issues on Windows 10 [Intelligent Guide]
- If you are having DNS issues information technology usually means you cannot surf the web properly.
- Make few changes in the settings or shift the supplier if your DNS host is not responding.
- You can plough off the peer-to-peer download for the Windows updates to quickly fix Windows 10 DNS errors.
- Changing power options and reinstalling network adapters will resolve any DNS problem on Windows 10.

XINSTALL BY CLICKING THE DOWNLOAD FILE
In order to access the Cyberspace, your DNS has to work without any problems. Unfortunately, users reported single DNS issues on Windows 10 that prevent them from accessing the Cyberspace.
There's a outspread of DNS issues, especially the DNS server non responding error which plagues Windows 10 users as intimately.
Today, we'll help you pluck more or less DNS settings in Windows 10 and hopefully resolve the issue on your Windows 10 PC or laptop.
How to fix DNS server issues in Windows 10?
- Use Prompt
- Turn off the peer-to-peer download for Windows updates
- Reinstall your web adapter drivers
- Change Baron Options settings
- Make sure that Microsoft LLDP Protocol Driver is enabled
- Perform Fair boot to fix DNS issues on Windows 10
- Change the configuration of the wireless router
- Use Google's world DNS server
- Modification the Mack treat of your mesh transcriber
- Remove Winsock keys from the registry
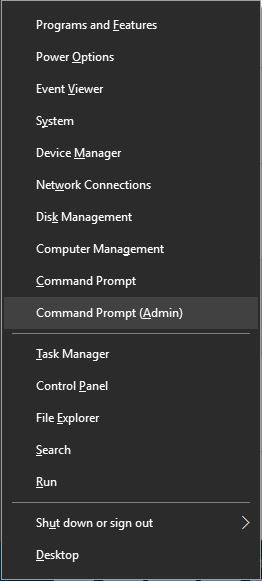
1. Use Command Prompt
- Start Command Prompt as an administrator by pressing Windows Key + X to raw the Power User Menu.
- Select Command Prompt (Admin) from the menu.
- When Program line Prompt opens enroll the following lines and press Enter after each:
                ipconfig /flushdns
ipconfig /registerdns
ipconfig /release
ipconfig /renew
NETSH winsock reset catalog
NETSH int ipv4 reset readjust.log
NETSH int ipv6 reset readjust.log
Pop off
After you close the Prompt check if the issue is resolved. According to users, you can fix issues with DNS by using Prompt.
Many network issues are caused by malware, several scripts, and bots. You can secure yourself by installment a VPN. Information technology will protect your PC from attacks while browsing, mask your IP address, and pulley all unwanted access.
2. Turn soured the equal-to-equal download for Windows updates
- Unstoppered the Settings app and go to Update &adenosine monophosphate; Security subdivision.
- Click Advanced options.
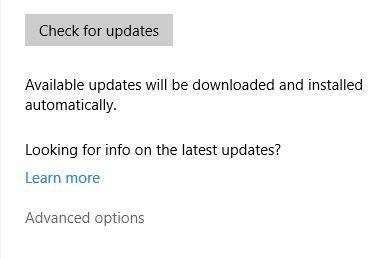
- Now snap on Prefer how updates are delivered.
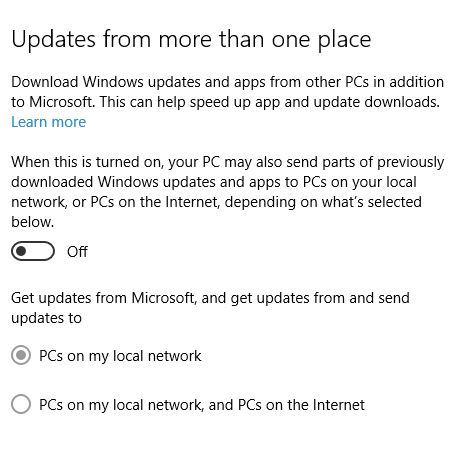
- Select PCs on my local network and release off Updates from more than unrivaled place.
- Close the Settings app and check if the issue is resolved.
Sometimes Windows Updates force out cause issues with DNS. One potential solution that users found is to disable equal-to-peer download for Windows updates.
3. Reinstall your network adapter drivers
- Jam Windows Key + X and select Device Managing director from the list of results.
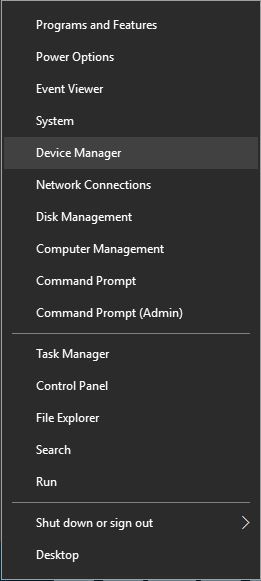
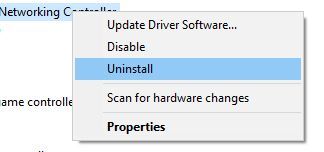
- Locate your network adaptor, right-click it and choose Uninstall.
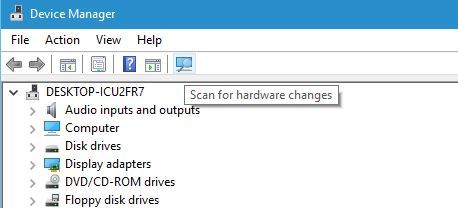
- After you uninstall information technology, click the Read for hardware changes button.
- Settle your network adaptor once again, right-click it and select Update Number one wood Software.
- Choose the option to Search mechanically for updated number one wood software.
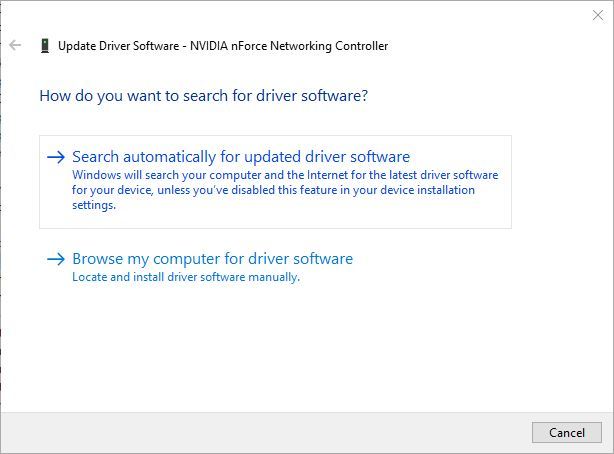
- Time lag for Windows 10 to download and install the needful package on your twist.
- We also commend victimization a third-party tool around to mechanically download all the obsolete drivers on your Microcomputer.
Some users arrogate that you can fix this issue past removing and reinstalling your network adapter driver.
Update drivers automatically
Updating your drivers using the Device Manager is non the incomparable way to find the latest drivers. Hence, we strongly paint a picture installing a third base-party driver installer.
You won't call for to seek for drivers manually anymore. Dedicated driver updater software will facilitate you be intimate automatically past playacting intermittent scans and qualification sure everything is up-to-date.
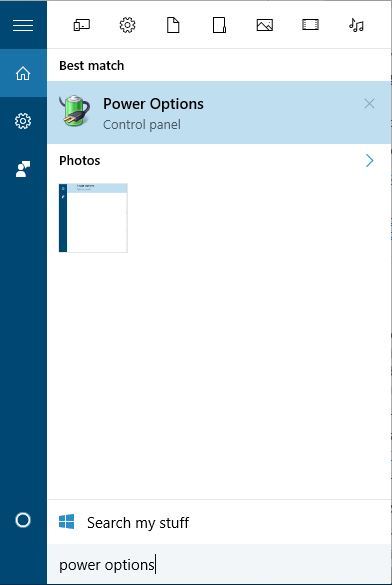
4. Change Business leader Options settings
- Compress Windows Key + S and enter exponent options.
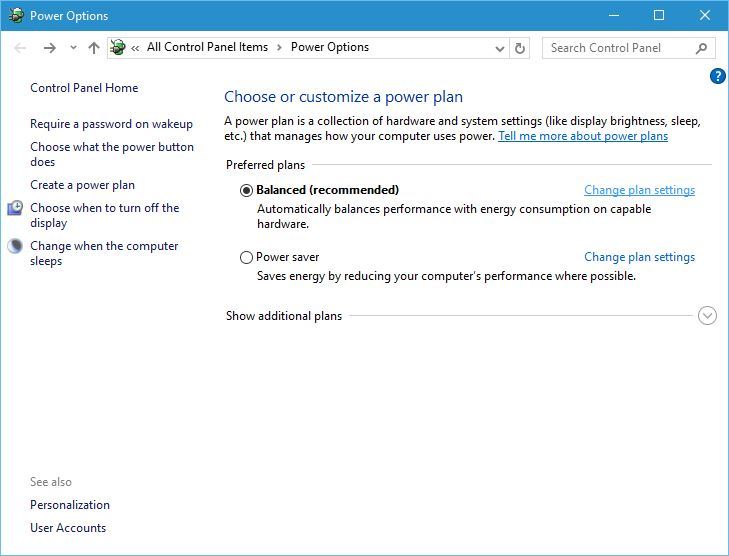
- Select Power Options from the fare.
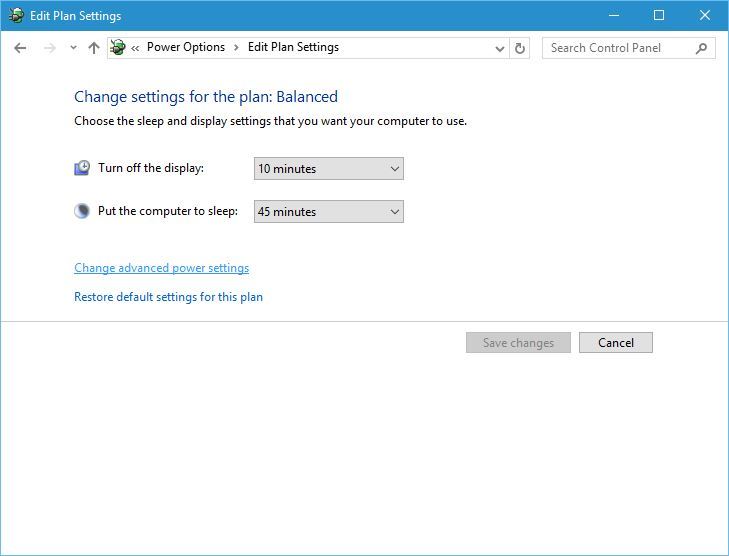
- Locate your current power plan and click Variety plan settings.
- Now click on Change progressive power settings.
- Locate Wireless Adapter settings and set them to Maximum Performance.
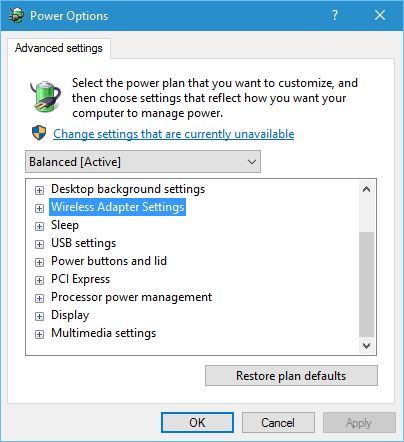
- Click Use and OK to save changes.
You can fix this trouble by changing the power settings of your radio network adapter.
5. Make sure that Microsoft LLDP Communications protocol Driver is enabled
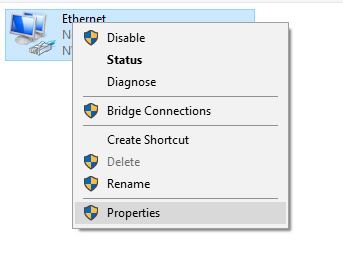
- Press Windows Key out + X and choose Network Connections.
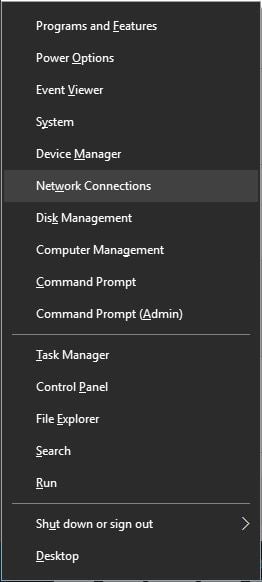
- Network Connections window testament appear. Locate your network connection, right-chatter IT and prefer Properties.
- Locate Microsoft LLDP Protocol Number one wood and get to sure that is enabled.
- Click the OK button to save changes.
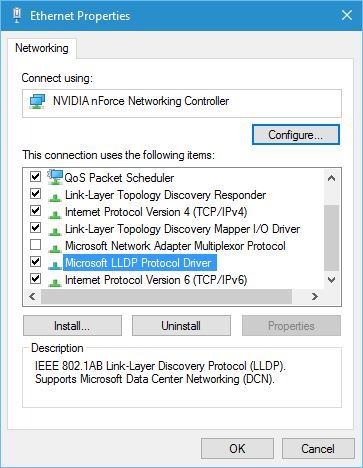
If you sustain issues with DNS we suggest that you check if the Microsoft LLDP Protocol Driver is enabled for your connection.
6. Perform Clean boot to fix DNS issues on Windows 10
- Press Windows Key + R and enter msconfig .
- ClickO.k. or press Get in.

- When System Configuration window opens go to Services tab.
- Check Hide all Microsoft services and click Disable all button.
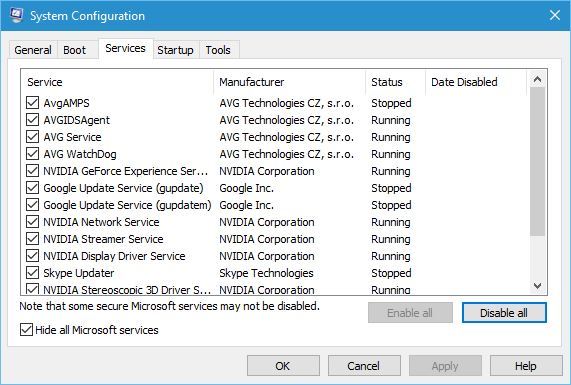
- Sink in Utilise and OK to save changes.
- Restart your PC.
Expert Tilt: Some PC issues are unyielding to tackle, especially when it comes to corrupted repositories operating room missing Windows files. If you are having troubles fixing an error, your system of rules Crataegus oxycantha be partially broken. We recommend installment Restoro, a tool that will glance over your machine and identify what the fault is.
Click hither to download and start repairing.
Now you can repeat the same steps and enable services peerless by one until you find the problematic one.
According to them, around one-third-party military service was interfering with DNS and after finding and disabling the debatable service the come forth was resolved
7. Alteration the configuration of the wireless router
Users reportable that Windows 10 has many issues with certain wireless frequencies and standards.
To fix this issue, you require to change your wireless router settings.
It seems that Windows 10 has problems with 2.4GHz networks, therefore if your radio receiver adapter supports 5GHz frequency puddle sure that you use it.
If your transcriber doesn't work with 5GHz relative frequency be for certain to use 2.4GHz Legacy option as an alternative. For more than details on how to change these settings live sure to check your tune router manual.
8. Usance Google's public DNS server
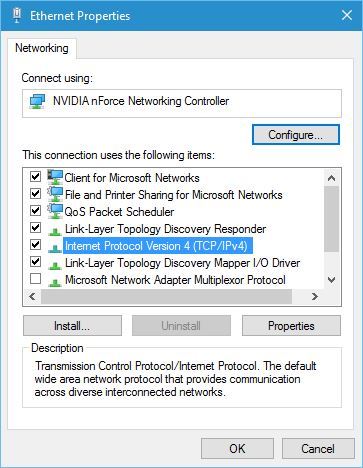
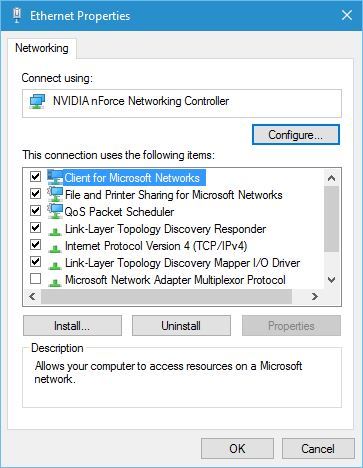
- Open Network Connections, locate your connection, right-wing-click information technology and opt Properties.
- Once the Properties windowpane opens select Internet Protocol Version 4 (TCP/IPv4) and then open Properties.
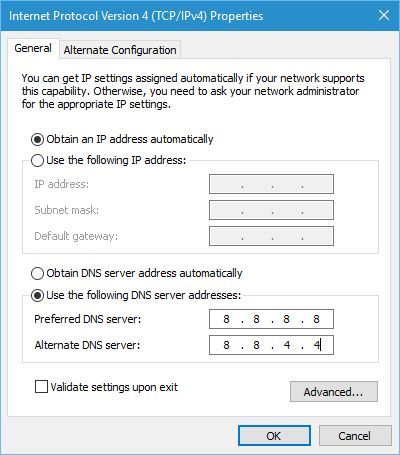
- Select Use the favourable DNS server addresses and set 8.8.8.8 asPet DNS waiter and 8.8.4.4 arsenic Jump DNS server.
- One time you're done, click OK.
Your ISP's DNS waiter might have some issues, thus you might desire to use Google's public DNS instead. To do that follow these stairs.
Alternatively, some users are suggesting to use 208.67.222.222 as Preferred DNS server and 208.67.222.220 A Jump DNS server.
<!– wp:windowsreport-companion/editorial-note-block {"text":"CloudFlare has new launched a disembarrass DNS server, and you can read all active information technology in our article about using DNS server 1.1.1.","icon":"/wp-content/themes/windowsreport/assets/images/svg/note-pencil.svg"} /–>
9. Modification the MAC speak of your network adapter
- Starting signal Command Prompt as decision maker.
- Enter ipconfig /all and press Recruit.
- Situate Physical Address apprais.
- That is your Mackintosh address. In our event that was 00-A1-FF-05-DA-11.
- Today open Electronic network Connections and open your network adapter properties.
- Click the Configure button.
- Go to Advanced tab and select Network Address.
- Check the Prize option and enter the MAC address that you got in Step 3.
- Birth in mind not to enter some dashes.
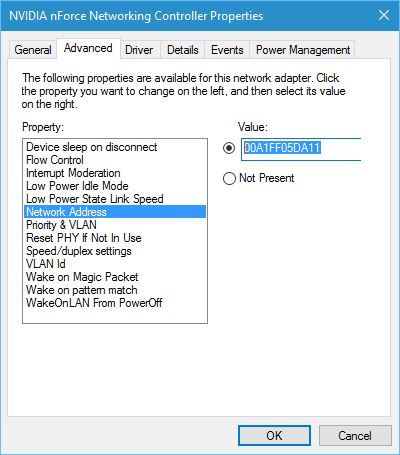
- Once you'Ra cooked click the OK button.
- Restart your PC and check if the issue is resolved.
To do this solution first you need to find out your net adapter's MAC address. To do that, follow these steps:
10. Remove Winsock keys from the register
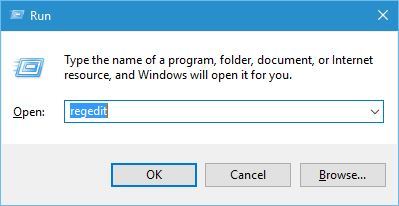
- Press Windows Key + R and go into regedit and press Enter to start Registry Editor.
- In the left pane navigate to:
ComputerHKEY_LOCAL_MACHINE - Then attend:
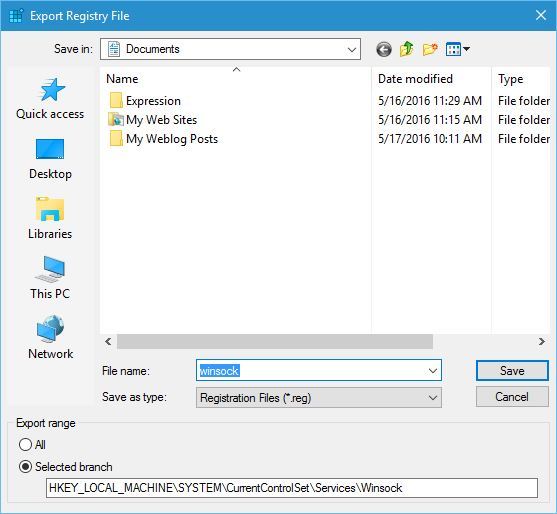
SYSTEMCurrentControlSetServices - Locate Winsock and Winsock2 keys.
- Right-click to each one of import and choose Export.
- Save them as winsock and winsock2.
- After you've exported both Winsock and Winsock2 keys, you need to delete them.
- Suitable-click each key and choose Delete from the menu.
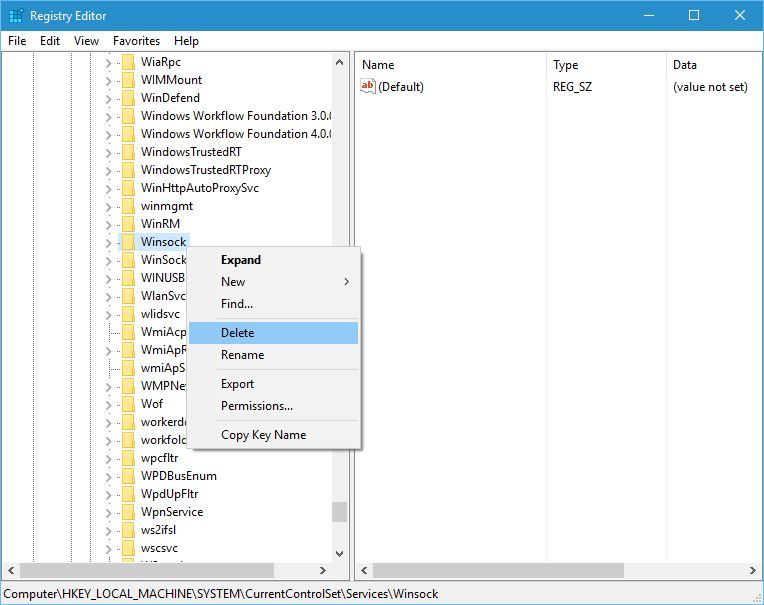
- Restart your PC.
- Once your estimator restarts, commencement Register Editor program once more.
- Attend Lodge > Consequence.
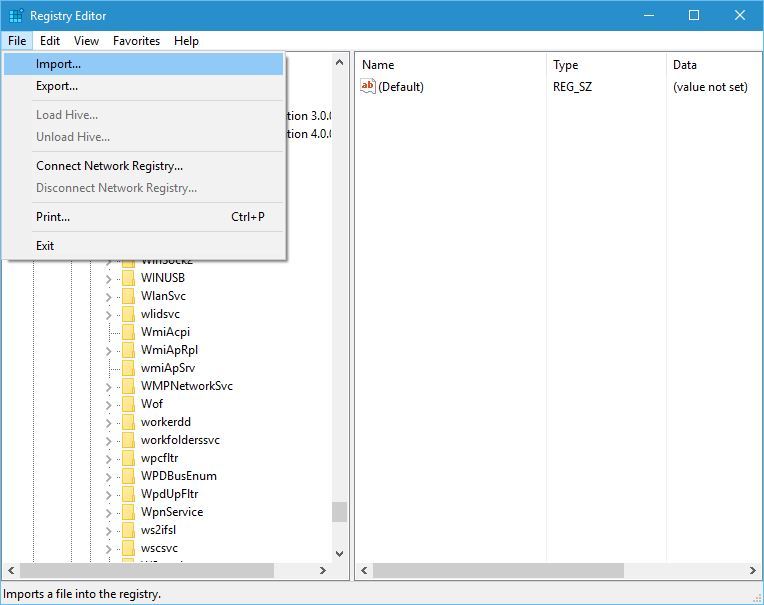
- Select winsock and click Unfold.
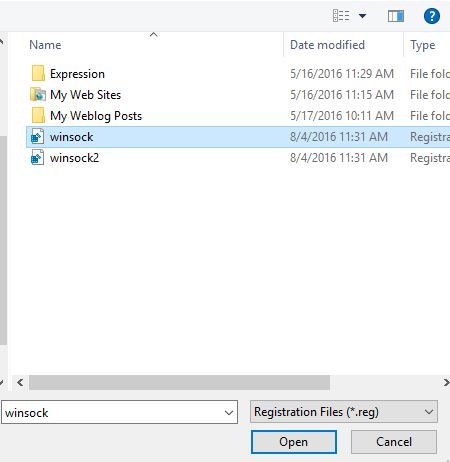
- After importing winsock file import winsock2 as well.
- Restart your PC once again and check if the problem is resolved.
If your DNS is not responding, you can try removing the Winsock keys from the registry.
DNS problems can prevent you from accessing the Internet, and if you have DNS issues along your Windows 10 PC or laptop, be in for to try some of our solutions.
If your DNS is not responding the least bit, you can consult the solutions from this detailed article dedicated to repair the issue.
![]()
How to fix DNS issues on Windows 10 [Quick Guide]
Source: https://windowsreport.com/dns-issues-windows-10/

Posting Komentar untuk "How to fix DNS issues on Windows 10 [Quick Guide]"